A Beginner's Guide to AuthN and AuthZ with Istio
Service meshes solve some of the key challenges in the cloud-native world today, and in this post I’ll be discussing about security.
The Istio service mesh provides several security features including identity assignment for workloads, TLS encryption, AuthN (Authentication), AuthZ (Authorization), and more. In this article, I’ll be focusing mainly on the aspect of AuthN and AuthZ policies.
Introduction
In our day-to-day lives we provide some form of identification to avail services such as healthcare, access services like email, etc. Authentication is the process of verifying these identities in order for one to be granted access to a system.
In the example of a healthcare system, providers may have access to a wide array of patient data, while patients would have limited access i.e. typically to their own data. Both entities here have access to the same system, but it’s their role that determines the kind of data available to them. Simply put, Authorization is the process of protecting a system by granting users permissions to access only the resources they’re entitled to.
Sessions
Web applications leverage the concept of sessions for the purpose of AuthN and AuthZ. A session is used to identify and store temporary information related to a user over several requests as the user interacts with the system. Typically, a session is established at the time of login and is torn down when the user logs out.
There are mainly 2 types of sessions:
- Server-side sessions
- Client-side sessions
Server-Side Sessions
Server-side session implementations typically generate a random ID for the authenticating user and it is stored in the browser in the form of a cookie. The cookie is then presented to the server on each request made by the user, thereby allowing it to identify and store information related to the user.
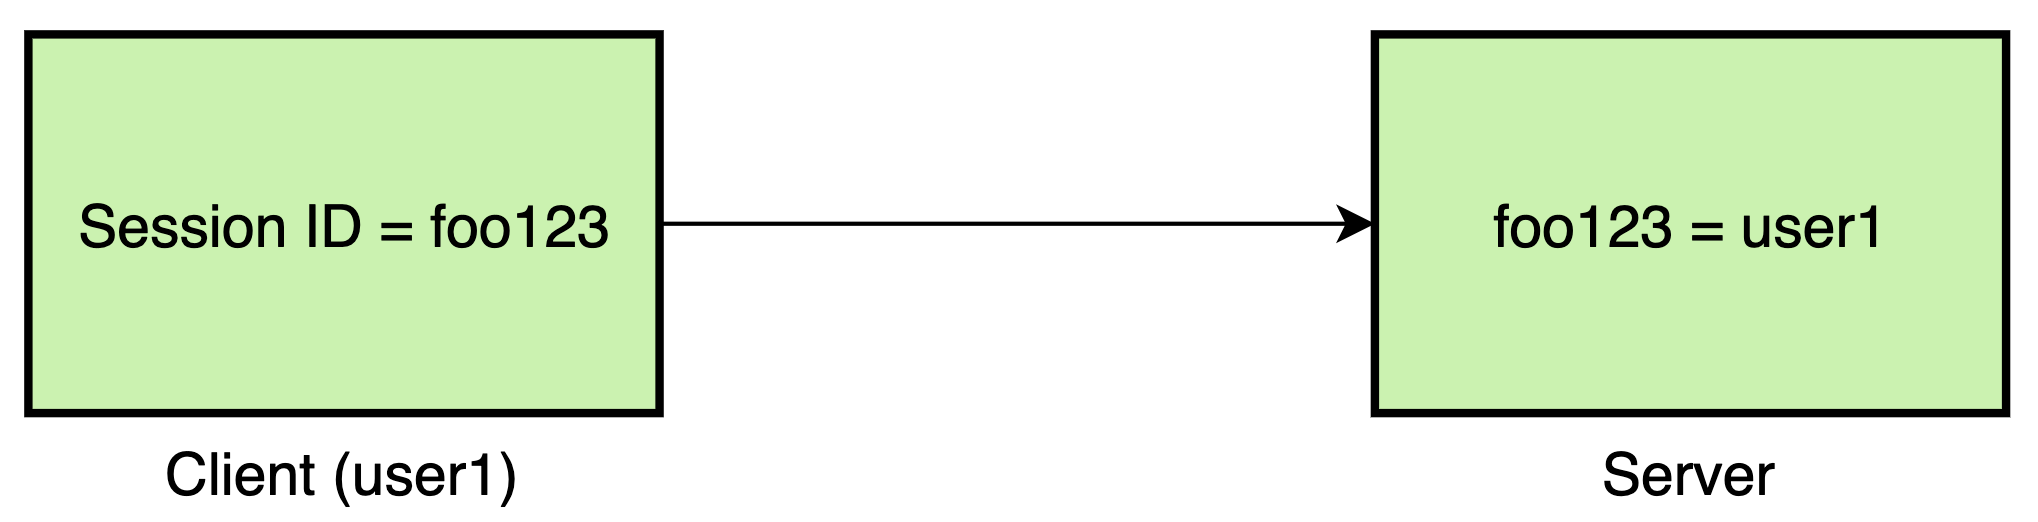
One of the main challenges with server-side sessions is that it makes scaling difficult. If you need to scale the number of web server instances, you’d either need to replicate session information across all the instances, or ensure that a given user’s requests always land on the same instance.
Client-Side Sessions
Client-side session implementations also make use of cookies; however, instead of storing just a random ID, useful user information is embedded in the cookie.
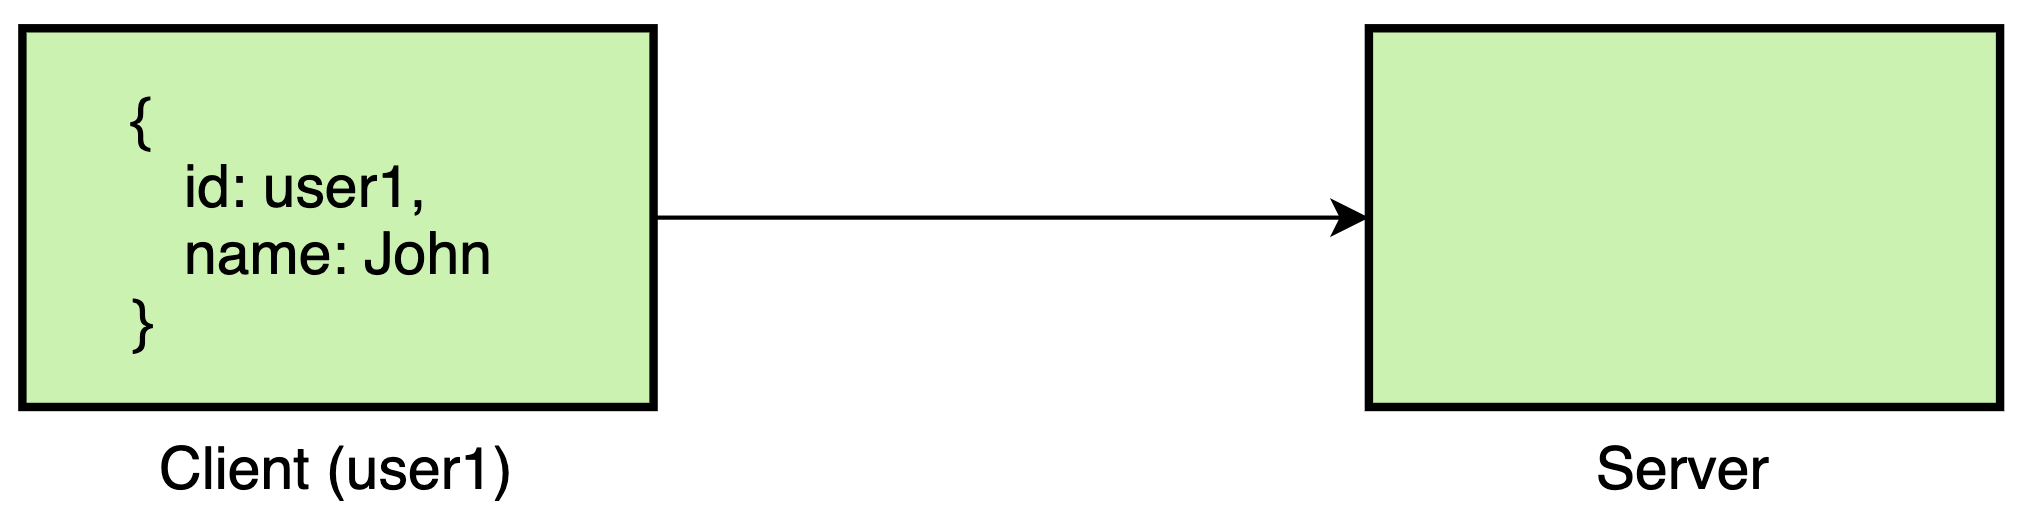
Client-side sessions allow for better scalability on the server side as the overhead of mapping an ID to a user entity disappears. This also means that we don’t need to replicate user session information across web server instances, and each instance can be stateless i.e. a request could be routed to any instance and it should be able to easily identify the user using the details directly available in the cookie.
In this article I’ll be focusing on one such implementation called JWT. You can read more about sessions in this article.
JWTs (JSON Web Tokens)
JWTs (JSON Web Tokens), pronounced jot, are essentially JSON objects that are encoded and digitally signed to protect their integrity. JWTs are made up of 3 Base64-URL segments (header, payload, and signature) separated by dots. The header specifies the algorithm used for signing. The payload holds claims i.e. information about the user. The signature can be generated using an alogrithm like HMAC with a secret, or RSA using a pair of public/private keys.
For more information on JWTs you can refer to this article.
A Sample JWT
Let’s look at the sample JWT below. There are 3 segments, separated by the 2 white dots. The first segment in green is the header, the second one in pink is the payload, and the third one in blue is the signature. This JWT is signed using the HS256 HMAC algorithm.
eyJhbGciOiJIUzI1NiIsInR5cCI6IkpXVCJ9.eyJzdWIiOiIxMjM0NTY3ODkwIiwibmFtZSI6IkpvaG4gRG9lIiwiaWF0IjoxNTE2MjM5MDIyfQ.SflKxwRJSMeKKF2QT4fwpMeJf36POk6yJV_adQssw5c
You can decode this JWT using the following commands.
# Export the JWT string into a variable.
$ export JWT='eyJhbGc....dQssw5c'

# Decode the header.
$ echo $JWT -s | cut -d '.' -f 1 | base64 -d
{"alg":"HS256","typ":"JWT"}

# Decode the payload.
$ echo $JWT -s | cut -d '.' -f 2 | base64 -d
{"sub":"1234567890","name":"John Doe","iat":1516239022}
Generating a JWT
Let’s now look at how you could generate your own JWT and sign it. In this example, I’ll be using a pair of public/private keys and sign the JWT using the RSA256 RSA algorithm.
To generate an RSA256 signature for the JWT, we first need to generate a pair of public/private keys. This can be done like so:
$ openssl genrsa -des3 -out private_encrypted.pem 2048
$ openssl rsa -pubout -in private_encrypted.pem -out public.pem
$ openssl rsa -in private_encrypted.pem -out private.pem -outform PEM
Next, we can generate the JWT using the Python Authlib library.
# Code to generate the JWT.
$ cat <<EOF | python3 -
from authlib.jose import jwt
header = {'alg': 'RS256'}
payload = {'iss': 'venilnoronha.io', 'sub': 'user1', 'exp': 1257894000}
private_key = open('private.pem', 'r').read()
bytes = jwt.encode(header, payload, private_key)
print(bytes.decode('utf-8'))
EOF

# The generated JWT.
eyJhbGciOiJSUzI1NiIsInR5cCI6IkpXVCJ9.eyJpc3MiOiJ2ZW5pbG5vcm9uaGEuaW8iLCJzdWIiOiJ1c2VyMSIsImV4cCI6MTI1Nzg5NDAwMH0.fmMlvXcDrDw1_yCVUSxTFP0ptOEr94-Yo2QXGUc19qitYg8zpVWUkEBvty1dlsWw9nRkQUFzFoq6plYly_UbKQIbIFwoRepiicrqLDBFuNEnknks8c9-b5AMTZl6IrY7uWhjHquMR7zTRnLVjHaJYI_dH-wlMZpet5snGbGFl2HxfUm03HrdjVP0ICapPUUt5L0MZzu1CoJ1eoS0fceWf2nORZeIwhl45g4edlrHc3GwoTDa4GilS88W8UEFZxPs_GDYKpnv6Z5eMdccwa2H0FQEWxb717bBQHS2_C6oX3_MLkm86wXetg9_GVWQudHicI0x90BDRdX8GLrrU3rG1A
Note that I have set the following 3 claims in the JWT payload.
issidentifies the issuer of the JWT.subrefers to the subject of the JWT.expis the expiration time after which the JWT shouldn’t be accepted in the system.
To learn more about JWT claims, you can refer this RFC.
Verifying a JWT
We can use the same Authlib library to parse and validate the generated JWT as shown below.
# Export the JWT to a variable.
$ export JWT="eyJhbGc....rU3rG1A"

# Code to verify the JWT.
$ cat <<EOF | python3 -
from authlib.jose import jwt
public_key = open('public.pem', 'r').read()
claims = jwt.decode('$JWT', public_key)
claims.validate()
print(claims)
EOF

# The parsed claims from the JWT.
{'iss': 'venilnoronha.io', 'sub': 'user1', 'exp': 1257894000}
Web applications typically run these validations and process JWT claims for providing users access to resources. Although straightforward, this adds overhead on application developers and we can simplify this to a large extent using AuthN/AuthZ policies in Istio.
AuthN/AuthZ Policies in Istio
Istio supports mainly 2 Kubernetes CRDs (Custom Resource Definitions) in the context of AuthZ/AuthZ.
RequestAuthenticationenables authentication of requests based on authentication information in requests, and configured rules.AuthorizationPolicyenables authorization of requests based on apply/deny rules configured for a workload.
RequestAuthentication in Istio
Let’s now look at a RequestAuthentication policy in action. To do that I’ll first deploy the
httpbin and sleep applications into my cluster and make a few HTTP requests to observe the
behavior.
# Deploy the httpbin and sleep applications.
$ kubectl apply -f istio-1.9.0/samples/httpbin/httpbin.yaml
$ kubectl apply -f istio-1.9.0/samples/sleep/sleep.yaml

# Create an alias for executing the curl command from within the sleep pod.
$ alias kcurl="kubectl exec sleep-67d8bf54cb-fh5x2 -- curl"

# Send an HTTP GET request from the sleep pod to the httpbin service.
$ kcurl -sI -X GET httpbin:8000/get | head -n1
HTTP/1.1 200 OK

# Send an HTTP POST request from the sleep pod to the httpbin service.
$ kcurl -sI -X POST httpbin:8000/post | head -n1
HTTP/1.1 200 OK
Next, we can apply a RequestAuthentication policy to validate JWTs that are sent in the requests
to perform authentication. To do that, we’ll first generate a JWK (JSON Web Key) from the public key
we previously generated.
# Code to generate the JWK.
$ cat <<EOF | python3 -
from authlib.jose import jwk
public_key = open('public.pem', 'r').read()
key = jwk.dumps(public_key, kty='RSA')
print(key)
EOF

# The generated JWK.
{'n': 'ueebNpkIO0Jxog3U9NEQbgix8BV0MQZAvjIFnGs4OpL8_W2xJBFORcDJFE58bR0MMfnrD342hQMkOmGKoBoBzu01D5aoPR0TIusLk8JeLwa7x8uC5gSCOAbpkIhRrYGhMs0LtsQP481p5mdZuzIbLpWn7yHf1KV1Tq7wsWlT7y1xA52msa2rN_z7loUaaRJ2OBSIeFzkhD8IS2kRLCjGdove3kUXtTy2KzlyNMVo_2GjK0lrydZwlXlD8CUDMVYSpQUOOeH_LMFf2otu92UAUsEEcxvHaTPJ1GWCp7qhyy5q6V1GA5K-1ZfUUZr_CuChmITeXF9lV2701fwWCfhILQ', 'e': 'AQAB', 'kty': 'RSA'}
At this point, we can create the Istio RequestAuthentication policy to validate JWTs in incoming
requests to httpbin. Note that you could also provide the JWK by setting the jwksUri instead of
passing in the JSON object in the jwks field.
$ cat <<EOF | kubectl apply -f -
apiVersion: security.istio.io/v1beta1
kind: RequestAuthentication
metadata:
  name: request-auth
spec:
  selector:
    matchLabels:
      app: httpbin
  jwtRules:
  - forwardOriginalToken: true
    issuer: venilnoronha.io
    jwks: |
      {'keys': [{'n': 'ueebNpk....WCfhILQ', 'e': 'AQAB', 'kty': 'RSA'}]}
EOF
To verify that the authentication policy is in effect, we can send 2 requests from the sleep application to the httpbin application, one with an expired JWT and one with a valid JWT. You can easily generate these JWTs using the code snippet from the Generating a JWT section and using the payload as described below.
# Payload for generating an expired JWT.
payload = {'iss': 'venilnoronha.io', 'sub': 'user1', 'exp': 1257894000}

# Payload for generating a JWT without expiry.
payload = {'iss': 'venilnoronha.io', 'sub': 'user1'}
We can now send requests and verify the behavior.
# JWT verification fails.
$ export EXPIRED_JWT=eyJhbGc...rU3rG1A
$ kcurl -sI -H "Authorization: Bearer $EXPIRED_JWT" -X GET httpbin:8000/get | head -n1
HTTP/1.1 401 Unauthorized

# JWT verification succeeds.
$ export VALID_JWT=eyJhbGc...8qLwfAA
$ kcurl -sI -H "Authorization: Bearer $VALID_JWT" -X GET httpbin:8000/get | head -n1
HTTP/1.1 200 OK
Note that by default Istio will validate the JWT only if the Authorization header is specified. If
not, it will allow the request unless there’s also a AuthorizationPolicy defined to reject it.
AuthorizationPolicy in Istio
Now that we understand how Istio performs authorization, we can go one step further and define a
AuthorizationPolicy to perform access control using JWT claims. We can begin by creating a new
valid JWT for another user user2 using the following payload.
payload = {'iss': 'venilnoronha.io', 'sub': 'user2'}
We can now apply a simple AuthorizationPolicy to allow user1 to only make GET calls, and for
user2 to make calls only to the /status/* endpoints.
$ cat <<EOF | kubectl apply -f -
apiVersion: security.istio.io/v1beta1
kind: AuthorizationPolicy
metadata:
  name: auth-policy
spec:
  selector:
    matchLabels:
      app: httpbin
  action: ALLOW
  rules:
  - from:
    - source:
        requestPrincipals: ["venilnoronha.io/user1"]
    to:
    - operation:
        methods: ["GET"]
  - from:
    - source:
        requestPrincipals: ["venilnoronha.io/user2"]
    to:
    - operation:
        paths: ["/status/*"]
EOF
In this example, I’ve set action to ALLOW, but you could specify policies with action set
to DENY in which case those rules will be evaluated prior to rules that have it set to ALLOW.
Let’s make a few requests and observe the behavior of Istio with this authorization policy.
# Export the JWT for user2 into a variable.
$ export VALID_JWT2=eyJhbGc....AWO0LZw

# GET /headers returns a valid response for the JWT token for user1.
$ kcurl -sI -H "Authorization: Bearer $VALID_JWT" -X GET httpbin:8000/headers | head -n1
HTTP/1.1 200 OK

# GET /get returns a valid response for the JWT token for user1.
$ kcurl -sI -H "Authorization: Bearer $VALID_JWT" -X GET httpbin:8000/get | head -n1
HTTP/1.1 200 OK

# POST /post returns an error for the JWT token for user1.
$ kcurl -sI -H "Authorization: Bearer $VALID_JWT" -X POST httpbin:8000/post | head -n1
HTTP/1.1 403 Forbidden

# GET /get returns an error for the JWT token for user2.
$ kcurl -sI -H "Authorization: Bearer $VALID_JWT2" -X GET httpbin:8000/get | head -n1
HTTP/1.1 403 Forbidden

# GET /status/418 returns a valid response for the JWT token for user2.
$ kcurl -s -H "Authorization: Bearer $VALID_JWT2" -X GET httpbin:8000/status/418

    -=[ teapot ]=-

       _...._
     .'  _ _ `.
    | ."` ^ `". _,
    \_;`"---"`|//
      |       ;/
      \_     _/
        `"""`
In my examples above, policies were specifically applied to the httpbin application using the
selector attribute, but you could apply such policies to the Istio gateways too.
Conclusion
Istio can easily perform AuthN and AuthZ using simple policies as we observed in the examples above. This can greatly simplify the life of application developers as access control is taken care of by the service mesh itself. I used a simple HTTP application to showcase the power of policies in Istio; however, you could apply similar policies for gRPC traffic too. These policies can be further customized by specifying conditions using other supported attributes defined on this page.
I’d love to hear your feedback!
Disclaimer: My postings are my own and don’t necessarily represent VMware’s positions, strategies or opinions.